My photography workflow using Lightroom

A few people have asked me recently how I organise the photos taken on my DSLR, what tools I use to edit them and and what processes I use, so I thought I would share my workflow here in case it is of wider interest. I hope to do a series of posts on photography, so do let me know in the comments if there's anything you'd like me to cover.
I use Adobe Lightroom 5 to organise and browse my photos, do most of my editing and publishing/exporting/printing, and Photoshop CS6 for some selective creative editing.
This is not intended as a Lightroom tutorial as such, but rather a walk through of my processes, highlighting a few tips that have helped me along the way.
1. Importing and organising Photos
I pretty much always apply a develop preset when I import my photos. This is because I always shoot in RAW format and find that my unprocessed RAW files are rather dark. The develop preset I use brightens them and applies some basic adjustments, including the "Lens Profile Correction" to correct distortions and remove vignetting. This means that when I come to review them, I have a better idea of their potential (instead of having to imagine what they would look like if they were brighter etc.) and a good baseline to work from, saving me lots of time.
To do this, you need to create a preset in advance. You can do this by taking a photo into develop mode, making whatever adjustments you would like to get the exposure correct, brighten shadows, adjust tones and vibrancy etc. and then clicking the + next to Presets to name and save your develop preset. If you want to add in a lens profile correction (only necessary for RAW files), you will find this under "Lens Corrections", near the bottom on the right hand side.
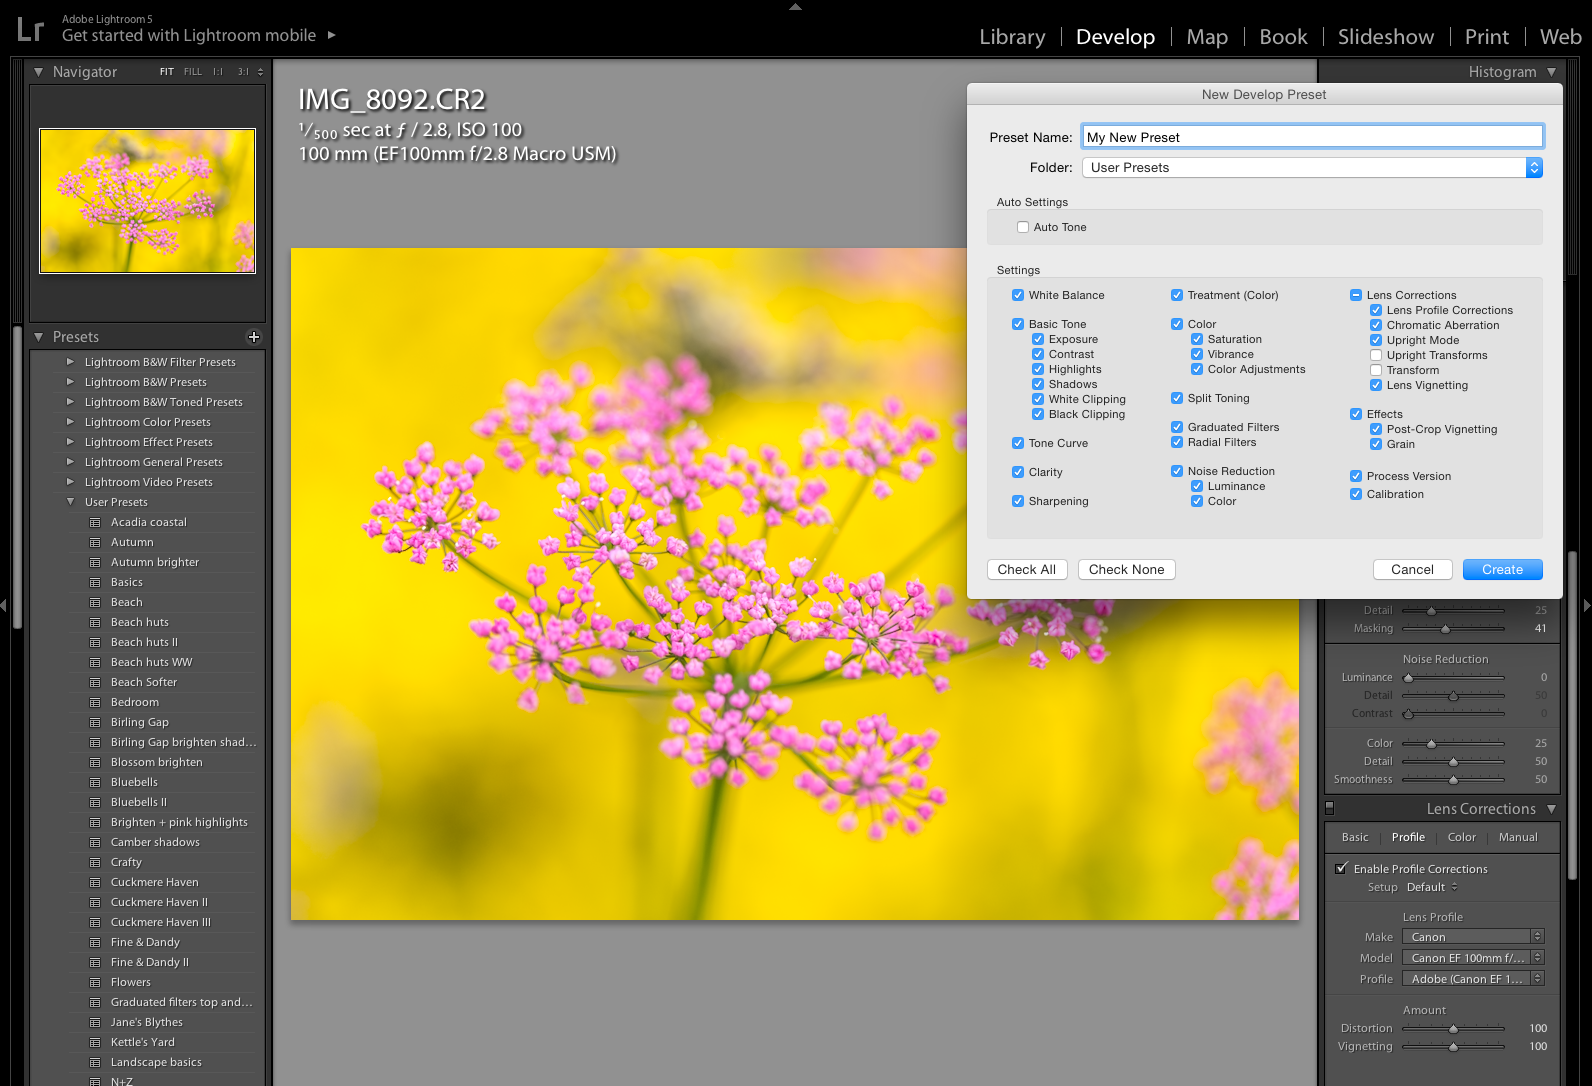
I would suggest trying it out on a number of different photos taken under different lighting conditions before you apply it to all your photos during an import, to make sure it has the desired effect (if you hover over the presets in Develop mode you can see what effect they will have on your photo(s); simply click on the preset with a photo selected to apply it). You will probably need to adjust it several times (just repeat the process above to save a new preset; if you give it the same name it will overwrite your old one). It is near impossible to get one preset that works perfectly with all photos, so I tend to keep the adjustments fairly small and just use them as a baseline edit (you can obviously edit photos individually afterwards and choose other presets if necessary).

Once you've got a preset that you're happy with, and you want to apply it to your photos during import, go to the Apply During Import box on the right hand side of the import screen and select your preset from the list of User Presets under Develop Settings (in this example, mine is called Landscape basics). NB you can choose a different preset for each import, so you may prefer to create a range of presets for different lighting conditions.
At this stage, I add any keywords that apply to all of my photos and then select the Destination - the folder I want to import my photos to. My photos are organised broadly by place, and then by date within that. So, for example, I have a folder for "Cornwall" and then a sub-folder for each date I have taken photos. I usually create a sub-folder for each import by selecting the relevant parent folder (e.g. Cornwall) and ticking the "into subfolder" box under Destination and typing in the date or whatever name I want to give it. When you've finished, click the Import button to import your photos, create your folder(s) and apply your develop presets. Now you are ready to start sorting...
2. Sorting (colours and flags)
I tend to take a LOT of photos, so the sorting stage is crucial for me. I'm my own worst enemy and make a lot of work for myself as I can't help taking multiple photos of the same scene (especially waves!) to make sure I get the best one.
There are lots of ways to sort and flag your photos, so you need to find one that works for you. I use colour labels. I step through my photos in Library mode one by one and delete any obvious duds. At the same time, I apply a YELLOW colour label to those photos I want to edit and think are worthy of publishing. Later on I use RED to indicate photos that have been edited and are ready to publish, and change this to PURPLE once they have been published (on Flickr).

This way, by applying a colour filter, I can quickly see at a glance which photos I need to edit, are ready to publish, or have been published (really useful when I'm looking for final versions of photos in a rush).
If you want to use colour labels, make sure you have the Colour Labels showing at the bottom of your screen (click the small arrow at the bottom right of the centre panel and tick Colour Label). When you have one or more photos selected you can then click on a colour label to apply it to your photo(s).

To view and filter your photos by colour label you'll need to show the filter bar at the top of the centre panel (View > Filter bar) and then click Attribute to see and click on the colours you want to filter by.

You can of course use the star rating system and/or the flags as well as, or instead of, the colour labels.
Once I've finished going through my photos, I apply the yellow filter and have a quick check to make sure I've got the right photos selected - I might add a few more at this stage or remove a few if I've got lots of very similar shots. I'm now ready to start editing....
3. Editing
I won't go into detail here about editing or this post will never end. Instead I'll just pick out a few tips:
Create and apply presets to save time (see above for how to do this). This works particularly well when you have a group of photos that have been taken under similar lighting conditions. To apply a preset, have a photo open in Develop mode and click on the preset; if you hover over the presets you can see the effect they will have on your photo in the thumbnail in the top left.
If you want to apply the same edits you just made to one photo to your next photo, click the "Previous" button at the bottom of the right-hand panel in Develop mode.
If you want to experiment with a few different edits/styles/crops to the same photo, you can make virtual copies of it first. To do this, right-click a photo in Library mode and select "Create Virtual Copy". You can then edit away to your heart's content and compare all the different versions.
When I want to do some more creative edits, or where I need to clone out an object from the background, I will take the photo into Photoshop. You can do this directly from Lightroom by right-clicking your photo and selecting Edit in > Edit in Adobe Photoshop. I'm a big fan of the time-saving Florabella Photoshop Actions. Once you've finished editing your photo in Photoshop, if you press Save, it will create a virtual copy in Lightroom and save it as a .tiff file. These files tend to be huge in size, so instead I tend to do File > Save As and save it as a .jpeg file in the same folder. I then go back into Lightroom and import the .jpeg. This way, I have all my edited photos together.
4. Titles, tags and other meta data
Once I've finished editing my photos and I've applied the Red colour label to those I want to publish, I will then go through and add titles and tags to each of them in Library mode. You can multi select photos to add the same tags. I publish my photos to Flickr, so tags are a great way to get my photos found by other users and search engines.
You can also search your own photos by tag in Lightroom if you can't remember where you saved something. Go to the Library Filter bar at the top of the screen and click on Text (if you can't see the Filter bar, click on View > Filter bar to show it). You can then search by tag or title.

5. Publishing / exporting / watermarks
I have set-up the built-in publishing service to publish my photos directly from Lightroom to Flickr at the click of a button. All the meta data I enter in Lightroom (including titles, captions and tags) is taken over to Flickr.
To set-up the Flickr publishing service (there is one for Facebook as well), click the + next to Publish Services at the bottom left of your screen and choose "Go to Publishing Manager..." click Add, select Flickr and complete the relevant boxes.

Once set-up, all you need to do to publish photos to Flickr, is drag and drop them into the Flickr photo stream under Publish Services (you can drag and drop them to reorder if you like) and then click Publish.

For exporting files to my hard drive, I don't use the plug-in manager/publish service, as the size/quality and location I want to export to changes all the time. I have, however, set-up a watermark that I optionally apply to photos as I export them, depending on context. To set this up, select the files you want to export and do File > Export, scroll down to Watermarking, tick the box and then select Edit Watermarks and play around with the settings until you are happy. You can just uncheck the Watermarks box when you don't want to apply it.


6. Deleting
This is the final stage of my sorting and a very important one! Once I've got a good crop of photos that I've edited and am happy with, I go back through my photos and delete anything that doesn't have a colour label applied. I feel happier deleting at this stage (rather than earlier) as I know I'm very unlikely to come back to my photos looking for alternatives. I also format my SD card in my camera, ready for the next use (this is a quick way to delete all the files on it).
7. Backing Up
I know this isn't the most exciting of topics, but it is a really important one. I have two back-ups:
I use an iMac so make use of Time Machine for an easy back-up of all my files to an external hard drive. It runs away in the background and I never have to think about it.
I also use an online service called Crash Plan which also runs quietly in the background and backs up the files I select to the cloud. This is for the worst-case scenario of my computer/back-up drive being stolen, or the house burning down. I would be devastated if I lost a lifetime's worth of photographs. I decided it was something I cared enough about to warrant a paid-for service. It took a long time to back-up my files initially (about a month), but didn't interfere with me using my computer as it uses a limited amount of processor power. So far I haven't had cause to use it in anger (thankfully), but I'm glad to know it's there.
So, that was a bit of a monster post! I'd love to know what you thought - would you prefer smaller bite sized tips? Or more detail? Do you have any questions? I'd also love to hear any of your favourite Lightroom tips - I'm sure there's so much more I could be doing with it....

Save this post to Pinterest